Losing or damaging your car remote can be a major inconvenience. The good news is, for many Nissan models, you might be able to program a new or existing remote yourself, potentially saving you a trip to the dealership and associated costs. This guide is based on real-world experiences and provides steps you can try to program your Nissan car remote. While not guaranteed to work for every model and situation, these methods are worth exploring before seeking professional help.
Understanding Nissan Remote Programming
Nissan remote programming procedures can vary depending on the model year and specific vehicle. Generally, the process involves a sequence of actions that put the car into programming mode, allowing it to learn the signals from your remote key fob. This often involves using the ignition switch, door locks, and sometimes the hazard lights as visual cues.
It’s important to note that not all Nissan vehicles support DIY remote programming. Some newer models or specific situations might require specialized equipment and a professional technician. However, for many common Nissan models, particularly those from the early 2000s to the early 2010s, these methods have proven successful for many owners.
Step-by-Step Guide to Programming Your Nissan Remote (User-Reported Method)
The following steps are based on a user’s experience with a 2011 Nissan Versa Hatch. While your exact Nissan model may differ, this approach combines several commonly suggested techniques and might be the key to programming your remote. Remember to be patient and try each step carefully.
-
Get Inside and Lock the Doors: Begin by entering your Nissan and manually locking all doors using the electronic door lock switch on the driver’s side door panel.
-
Ignition Key Insertion and Removal: Take your Nissan key and insert it into the ignition switch. Quickly remove the key. Repeat this insert and remove action multiple times. Try around a dozen times to start.
-
Ignition Switch Push (Without Key): Locate the ignition switch (the slot where you insert your key). Push the ignition switch in and out repeatedly without inserting the key. You might notice the green key light illuminating on your dashboard when you push the switch. Do this about 10 times.
-
Re-insert Key (Briefly): Insert the key back into the ignition switch again and remove it a few more times. Around 3 to 10 repetitions might suffice. Do not turn the ignition to the ACC or ON position at any point during these steps.
-
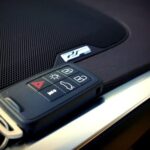
Test the Remote Fob: Without unlocking the car doors, press a button on your remote key fob. Observe if the doors lock or unlock, or if the hazard lights flash. In some cases, the hazard lights might flash to indicate successful programming.
-
Unlock and Test Again: If the remote seems to be working, unlock the car using the door lock switch on the door panel. Then, test all the buttons on your remote again to confirm proper functionality.
Important Considerations & Troubleshooting:
- Hazard Lights: In many standard programming procedures, hazard lights are expected to flash to confirm entry into programming mode or successful programming. However, as the original user noted, hazard lights might not flash during the process, and the remote can still be programmed. Do not solely rely on hazard light feedback.
- Green Key Light: The green key light illuminating when pushing the ignition switch without the key is a normal indicator related to the immobilizer system and might be part of the programming sequence.
- Door Locking/Unlocking: Avoid unlocking the car with the door lock switch until you are testing the programmed remote. Unlocking the door during the programming sequence might interrupt the process.
- Patience and Repetition: Remote programming can be finicky. It might require repeating the steps several times or trying slight variations in timing and repetitions. Don’t give up after the first attempt.
- Battery Disconnection (Try with Caution): In some cases, disconnecting the car battery for about 10 minutes and then reconnecting it before attempting the programming sequence can help reset the system. However, proceed with caution when disconnecting your car battery and ensure you know how to do it safely for your vehicle.
- Model Variations: Nissan models and years can have different procedures. If these steps don’t work, consult your owner’s manual for specific remote programming instructions for your Nissan model. You can also search online for guides specific to your year and model.
When to Seek Professional Help
If you’ve tried these DIY methods multiple times and are still unable to program your Nissan remote, it might be time to seek professional assistance.
- Dealership: Nissan dealerships have the diagnostic tools and expertise to program remotes for all Nissan vehicles. However, this is often the most expensive option.
- Automotive Locksmiths: Many automotive locksmiths specialize in car remote programming and key replacement. They can often provide a more affordable alternative to dealerships.
- Professional Mechanics: Some mechanics shops also offer remote programming services, particularly those specializing in automotive electronics.
Before seeking professional help, ensure that the issue isn’t simply a dead battery in your remote. Replacing the battery in your key fob is a simple first step to rule out a basic problem.
Conclusion
Programming a Nissan car remote yourself can be a convenient and cost-effective solution. By following these user-tested steps and being patient, you might be able to get your remote working again without needing to visit a dealership. Remember to consider your specific Nissan model and year, and don’t hesitate to seek professional help if DIY methods prove unsuccessful.