
Is your car’s air conditioning not blowing as cold as it used to? Especially in vehicles older than 6-8 years, a common culprit for diminished cooling performance is low refrigerant. Over time, even in sealed systems, refrigerant can slowly leak out, reducing your AC’s efficiency. Before you rush to a mechanic, learn how you can easily perform an Ac Refrigerant Recharge yourself and bring back that refreshing cool air into your car.
This guide is inspired by experiences shared within the car enthusiast community, aimed at empowering you with the knowledge to tackle this maintenance task. We’ll walk you through the process of recharging your car’s AC system, step-by-step.
Understanding the Basics
Before diving into the recharge process, it’s helpful to understand the components of your car’s AC system and why refrigerant is crucial. The system includes:
- Compressor: The heart of the AC, it circulates refrigerant under pressure.
- Condenser: Releases heat from the refrigerant.
- Evaporator: Absorbs heat from the cabin air, cooling it down.
- Expansion Valve: Regulates refrigerant flow and pressure drop.
- Refrigerant: The working fluid that absorbs and releases heat as it cycles through the system.
Low refrigerant means the system can’t efficiently absorb heat, leading to weak cooling. A simple ac refrigerant recharge can often solve this problem, assuming there are no underlying issues like leaks or compressor failure.
Is it Just Low Refrigerant? Initial Checks
Before you jump to recharging, it’s wise to rule out other potential AC problems. Here are a few quick checks:
- Compressor Engagement: Turn on your AC and listen for a click and engine RPM change, indicating the compressor is engaging. Visually inspect the compressor belt for proper function.
- Evaporator Drain: Check for water dripping under the car when the AC is running, indicating the evaporator drain isn’t clogged. Absence of water might suggest a blockage, but is not directly related to refrigerant level.
- Condenser Condition: Inspect the condenser (usually in front of the radiator) for debris blockage. Ensure fins are reasonably clean for proper airflow.
- Blower Fan: Confirm the cabin blower fan operates at different speeds.
- Cabin Air Filter: A clogged filter can restrict airflow, mimicking poor cooling. While not refrigerant related, it’s good practice to check its condition.
If these components seem to be functioning correctly, and your AC cooling has gradually weakened over time, low refrigerant is a likely cause and ac refrigerant recharge is a viable solution.
Tools and Materials for AC Refrigerant Recharge
To perform an ac refrigerant recharge at home, you’ll need the following tools and consumables:
-
AC Manifold Gauge Set: This is essential for measuring the pressures in your AC system. It typically includes gauges for low and high pressure sides, color-coded hoses, and quick couplers.
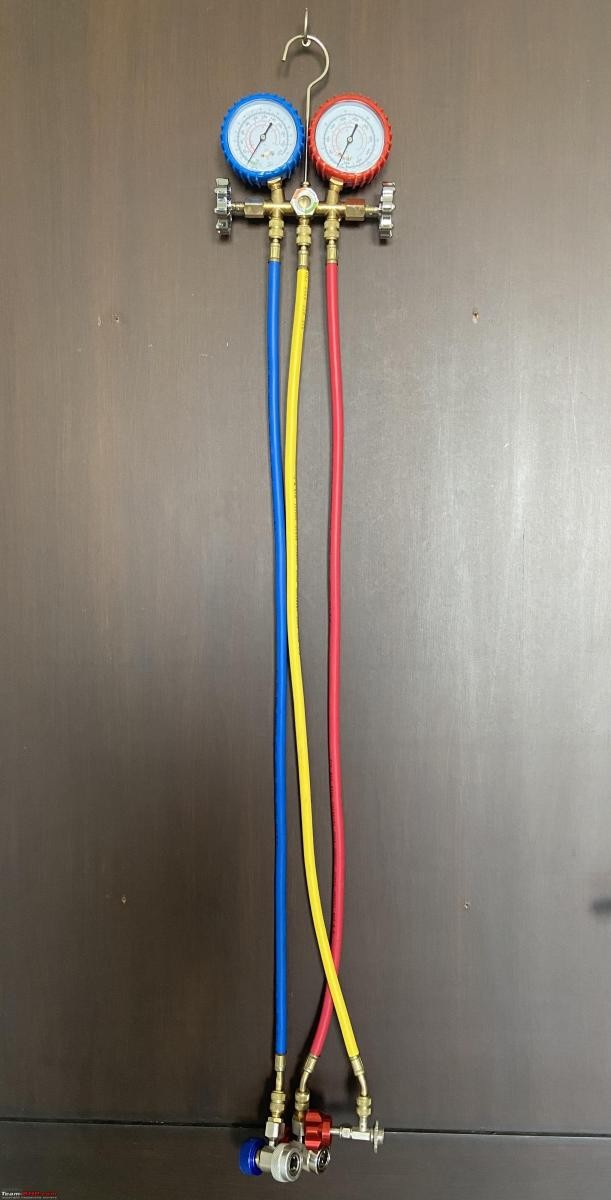 AC Manifold Gauge Set
 -
Refrigerant Can with R-134a Refrigerant: R-134a is a common type of automotive refrigerant. Check your car’s AC system sticker (usually under the hood) to confirm the correct type and quantity. A 12-14 ounce can is often sufficient for a recharge.
Alt Text: Can of R-134a refrigerant for car AC recharge, essential for restoring cooling efficiency in automotive air conditioning systems.
-
Can Tap Valve: This valve screws onto the refrigerant can and allows you to connect it to the manifold gauge set.
Alt Text: Close-up of a can tap valve used to pierce and control the flow of refrigerant from a can during an AC recharge process.
-
Probe Thermometer: A thermometer to measure the air vent temperature before and after recharge, verifying the improvement in cooling. A digital multimeter with a temperature probe works well.
Alt Text: Digital probe thermometer used to measure air conditioning vent temperature, essential for evaluating AC performance before and after refrigerant recharge.
-
Safety Goggles and Nitrile Gloves: Protect your eyes and skin from refrigerant, which can cause frostbite.
Safety First: Precautions Before You Begin
Working with AC systems and refrigerant requires caution. Always prioritize safety:
- Wear Safety Goggles and Gloves: Refrigerant can cause frostbite on contact with skin and eye damage.
- Work in a Well-Ventilated Area: Avoid inhaling refrigerant vapors.
- Do Not Overcharge: Overcharging can damage your AC system. Follow pressure guidelines carefully.
- Avoid Open Flames: Refrigerant is flammable under certain conditions.
- Dispose of Refrigerant Cans Properly: Empty cans should be disposed of according to local regulations.
Step-by-Step Guide to AC Refrigerant Recharge
Now, let’s get to the ac refrigerant recharge process. Follow these steps carefully:
Step 1: Prepare Your Vehicle and Equipment
-
Start the Engine and AC: Turn on your car’s engine and set the AC to maximum cooling (lowest temperature, highest fan speed).
-
Measure Vent Temperature: Use your probe thermometer to measure the initial air temperature from the vents. Note this reading for comparison later.
Alt Text: Measuring car AC vent temperature using a digital thermometer to assess cooling performance before refrigerant recharge.
-
Locate Service Ports: Open your car’s hood and locate the AC service ports. There are two ports:
- Low-Pressure (LP) Port: Usually on a larger diameter pipe. It will have a cap marked “L” or blue.
- High-Pressure (HP) Port: Usually on a smaller diameter pipe. It will have a cap marked “H” or red.
Alt Text: Identifying the low-pressure (LP) and high-pressure (HP) service ports in a car’s AC system for connecting manifold gauges during refrigerant recharge.
-
Prepare Manifold Gauge Set: Ensure both valves on the manifold gauge set are closed. Attach the blue hose to the low-pressure gauge, the red hose to the high-pressure gauge, and the yellow hose to the center port.
Step 2: Connect the Manifold Gauge Set
-
Remove Dust Caps: Remove the dust caps from both the LP and HP service ports. Keep them in a safe place.
Alt Text: Removing dust caps from car AC low and high pressure service ports before connecting refrigerant recharge gauges.
-
Connect Quick Couplers: Attach the blue quick coupler (on the blue hose) to the LP port and the red quick coupler (on the red hose) to the HP port. These couplers are designed to fit only the correct ports, preventing accidental misconnections. Ensure they snap securely into place.
Alt Text: Connecting color-coded quick couplers of the AC manifold gauge set to the low and high pressure service ports of a car’s air conditioning system.
-
Open Quick Coupler Valves: Gently open the valves on the quick couplers to allow pressure readings to register on the gauges.
Alt Text: Animated GIF showing the process of opening quick coupler valves on AC service ports to allow pressure readings on the manifold gauges.
Step 3: Check Initial Pressure Readings
-
Observe Gauge Readings: Note the pressure readings on both the low-pressure (blue) and high-pressure (red) gauges with the engine and AC running.
-
Compare to Pressure Chart: Find the R-134a pressure-temperature chart (often available online or included with the manifold gauge set). Compare your gauge readings to the chart based on the ambient temperature. This will help you determine if your system is indeed low on refrigerant.
Alt Text: R134a refrigerant pressure temperature chart used to diagnose AC system charge level based on ambient temperature and gauge readings during refrigerant recharge.
- Typical Readings (Approximate):
- Low Side: 30-50 psi
- High Side: 150-250 psi (varies significantly with ambient temperature)
Low readings on the high-pressure side often indicate low refrigerant.
- Typical Readings (Approximate):
Step 4: Recharge the Refrigerant
-
Attach Can Tap Valve to Refrigerant Can: Screw the can tap valve onto the R-134a refrigerant can. Ensure the valve is fully retracted (open position) before piercing the can.
Alt Text: Attaching a can tap valve to a refrigerant can in preparation for charging a car’s AC system during a DIY recharge procedure.
-
Connect Yellow Hose to Can Tap Valve: Connect the yellow hose from the manifold gauge set to the can tap valve.
-
Purge the Yellow Hose: Slightly loosen the yellow hose connection at the manifold to release air from the hose. Briefly allow a small amount of refrigerant to escape (this purges air and moisture from the line). Then, tighten the connection.
Alt Text: Animated GIF illustrating purging air from the yellow hose connected to the refrigerant can before initiating the AC recharge process.
-
Open Low-Pressure Side Valve: Slowly and gradually open the low-pressure side valve on the manifold gauge set to allow refrigerant to flow into the system. Observe the refrigerant flowing through the sight glass on the manifold (if equipped).
Alt Text: Opening the low-pressure side valve on an AC manifold gauge set to initiate refrigerant flow into the car’s AC system during recharge.
-
Charge in Short Bursts: Charge refrigerant in short intervals, monitoring the high-pressure gauge. Avoid overcharging. Refer to the pressure-temperature chart for your target high-side pressure based on ambient temperature.
Alt Text: Animated GIF showing refrigerant flowing through the sight glass of an AC manifold gauge set during a car AC refrigerant recharge.
-
Monitor Pressure Gauges: As you add refrigerant, the high-pressure gauge reading should gradually increase. Aim to reach the recommended high-side pressure range for your ambient temperature from the pressure chart.
Alt Text: Monitoring pressure gauges on an AC manifold set during refrigerant recharge, ensuring pressures reach recommended levels for optimal cooling.
Step 5: Monitor Pressure and Cooling Performance
-
Close Low-Pressure Valve: Once the high-pressure gauge reaches the target range, close the low-pressure valve on the manifold set.
-
Observe Gauge Readings: Monitor the pressure readings for a few minutes to ensure they stabilize within the expected range.
-
Measure Vent Temperature Again: Use your probe thermometer to measure the air vent temperature again. You should notice a significant decrease compared to the initial reading.
Alt Text: Measuring car AC vent temperature after refrigerant recharge to verify improved cooling performance with a digital thermometer.
Step 6: Final Checks and Disconnection
- Turn Off AC and Engine: Turn off your car’s AC system and then the engine.
- Close Quick Coupler Valves: Close the valves on the quick couplers.
- Disconnect Quick Couplers: Carefully disconnect the quick couplers from the service ports. Some refrigerant may escape – this is normal.
- Replace Dust Caps: Immediately replace the dust caps on the service ports to prevent dirt and debris from entering the system.
- Store Equipment: Disconnect the yellow hose from the refrigerant can. Safely store your manifold gauge set and remaining refrigerant.
When to Seek Professional AC Service
While ac refrigerant recharge can be a DIY task, there are situations where professional help is recommended:
- System Leaks: If you frequently need to recharge your AC, it indicates a leak. A professional can locate and repair leaks.
- Compressor Issues: If your compressor is noisy, not engaging, or showing other signs of failure, professional diagnosis and repair are necessary.
- Persistent Poor Cooling: If recharging doesn’t improve cooling performance, there might be other underlying issues like a faulty expansion valve or clogged condenser.
- Lack of Experience or Tools: If you are uncomfortable working on your car’s AC system or lack the necessary tools, it’s best to consult a qualified AC technician.
Conclusion: Enjoy Your Refreshed AC
Performing an ac refrigerant recharge can be a straightforward way to restore your car’s cooling power and comfort. By following these steps and prioritizing safety, you can often avoid costly trips to the mechanic and enjoy a cooler driving experience. Remember to monitor your AC performance and seek professional help if issues persist. Enjoy the satisfaction of DIY car maintenance and the refreshing cool air in your vehicle!