
The Wiper Relay is a crucial component of your vehicle’s wiper system, responsible for controlling the on/off function and speed of your wipers. A malfunctioning relay can lead to intermittent wiper operation or complete failure. This guide provides a detailed walkthrough for testing a wiper relay, specifically focusing on an Electrolux system found in 1989 Jaguar XJ-S models. Understanding the intricacies of this system will empower you to diagnose and resolve wiper issues effectively.
Testing the Wiper Motor
Before testing the wiper relay itself, it’s essential to ensure the wiper motor is functioning correctly. This process involves direct testing of the motor to rule out other potential problems. Accessing the wiper motor requires removing the cowl grille and wiper assembly. Refer to Figure 5 and Figure 6 for visual guidance during these tests.
Figure 5: Wiper Motor Wiring Diagram
Figure 6: Wiper Motor Plug Connector
Slow and Fast Speed Test:
- Connect a power supply’s ground to pin C on the wiper motor connector (Figure 6).
- Connect +12V to pin G. The wipers should run at low speed.
- Move the +12V connection to pin F. The wipers should now run at high speed.
If the wipers fail to operate at either speed, the motor itself is likely faulty. If the motor passes both tests, proceed to testing the park microswitch.
Testing the Park Microswitch
The park microswitch ensures the wipers return to their resting position after being turned off. This switch is located inside the wiper motor gearbox.
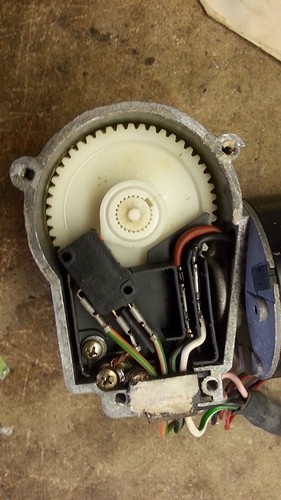 alt text: Internal view of wiper motor gearbox with park cam and microswitch highlighted
Figure 13: Wiper Motor Gearbox with Park Cam
Park Microswitch Functionality Test:
This test utilizes four pins on the wiper motor connector:
- G: Motor slow speed brush (Pin 5 in Figure 5)
- H: Microswitch Run pin (Pin 1)
- C: Microswitch Park pin and motor ground (Pin 4)
- B: Microswitch Common pin (Pin 2)
- Maintain the ground connection to pin C.
- Connect a jumper wire between pins B and G.
- Apply +12V to pin H.
If the microswitch is functioning correctly, the wipers will run until the cam lobe (Figure 13) opens the switch, cutting the circuit and stopping the motor in the parked position. If the wipers don’t run or don’t park, the microswitch is likely defective. Repeat the test after briefly running the motor in slow speed to ensure the motor wasn’t already in the park position.
Conclusion
Successfully completing these tests confirms a functioning wiper motor and park microswitch, often indicating a problem with the wiper relay itself or associated wiring. Understanding these testing procedures is crucial for accurate diagnosis and repair of wiper system malfunctions in vehicles equipped with the Electrolux system. This guide, while specific to a 1989 Jaguar XJ-S, provides a foundational understanding applicable to other vehicles with similar wiper systems. Remember to consult your vehicle’s specific wiring diagram for accurate pin identification.