
Imagine the convenience of arriving home and effortlessly opening your gate without fumbling for a separate remote. Programming your gate opener to your car’s built-in system makes this a reality, enhancing both security and ease of access to your property. This guide will walk you through the process of how to program your gate opener to your car, ensuring a smooth and efficient setup.
Why Program Your Gate Opener to Your Car?
Integrating your gate opener with your car offers numerous benefits, simplifying your daily routine and boosting your home’s security. Let’s explore the key advantages:
-
Unparalleled Convenience: Say goodbye to juggling multiple remotes. With your gate opener programmed to your car, a simple press of a button on your dashboard provides instant access. This is especially helpful in inclement weather or when you have a car full of passengers.
-
Enhanced Security: Having a dedicated button within your car reduces the risk of losing or misplacing your gate remote. It also provides a more discreet way to operate your gate, as there’s no need to carry a separate device.
-
Streamlined Access Control: For households with multiple drivers, programming the gate opener to each car ensures everyone has seamless access without the need for individual remotes. This simplifies access management and eliminates the hassle of sharing or distributing remotes.
Tools You’ll Need for Programming
Before you begin programming your gate opener to your car, gather these essential tools to ensure a smooth process:
- Your Gate Remote: The existing remote that currently operates your gate. Ensure it has working batteries.
- Your Car’s User Manual: This manual contains specific instructions on how to program your car’s built-inHomelink or similar system.
- A Screwdriver (Potentially): May be needed to access dip switches on older gate remote models or the receiver unit.
- Ladder (If Necessary): If your gate receiver unit is located high up, a ladder might be required for access.
Always consult your gate opener and car’s user manuals for model-specific instructions and safety precautions.
Step-by-Step Guide: Programming Your Gate Remote
The process of programming your gate remote generally involves these key steps. However, specific methods vary depending on whether you have a fixed-code (dip switch) or rolling code remote.
Identifying Your Gate Remote Model
The first crucial step is to identify the type of gate remote you have. This will determine the programming method you need to follow.
- Fixed-Code (Dip Switch) Remotes: These older remotes use a series of tiny switches (dip switches) inside the remote and receiver unit to set the security code.
- Rolling Code Remotes: Newer remotes utilize rolling code technology, which changes the security code each time the remote is used, offering enhanced security. These remotes typically require a “Learn” or “Program” button to sync.
Refer to your gate remote’s user manual or the manufacturer’s website to identify your model. If you’re unsure, examining the remote physically can often help. Dip switch remotes will have a compartment to access the switches, while rolling code remotes usually have a “Learn” button on the receiver.
Once you’ve identified your remote type, you can proceed with the appropriate programming method.
Programming Fixed-Code (Dip Switch) Remotes
If you have a dip switch remote, programming typically involves matching the dip switch settings between your remote and the receiver unit. Common brands with dip switch remotes include Multicode and Linear.
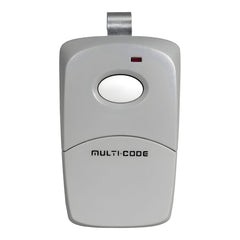
Alt text: Multicode 3089 dip switch gate remote, commonly used for gate and garage door openers.
Alt text: Linear DT1 dip switch gate remote, a reliable option for programming gate access.
Here are the general steps:
- Locate the Receiver Unit: Find the receiver unit for your gate opener. It’s usually a small box near the gate motor, often with an antenna.
- Access Dip Switches on Receiver: Open the receiver unit to locate the dip switches.
- Access Dip Switches on Remote: Open your gate remote to access its dip switches. This is often in the battery compartment.
- Match Dip Switch Positions: Set the dip switches in your remote to match the exact positions (up or down) of the dip switches in the receiver unit.
- Test: Close the compartments and test your remote to ensure it operates the gate.
To change the code entirely, alter the dip switch positions on both the receiver and the remote to a new, matching configuration.
Programming Rolling Code Remotes
Rolling code remotes offer greater security and are programmed differently. Brands like LiftMaster are well-known for using rolling code technology.
Alt text: LiftMaster 892LT rolling code gate remote, known for secure and reliable gate operation.
Alt text: EG642 universal rolling code gate remote, a versatile option for various gate opener systems.
Follow these steps for rolling code remotes:
- Locate the Receiver Unit: Find the receiver unit of your gate opener.
- Find the “Program” or “Learn” Button: Locate the “Program” or “Learn” button on the receiver unit.
- Press the Program Button: Press the “Program” or “Learn” button. An LED indicator light usually turns on to show it’s in programming mode.
- Press Remote Button: Press the button on your gate remote that you want to use to operate the gate.
- Test: Test the programmed remote button to ensure it opens and closes the gate.
Integrating Your Gate Opener with Your Car
Once your gate remote is working correctly with your gate, you can integrate it with your car’s built-in system, such as HomeLink or Car2U. Consult your vehicle’s owner’s manual for the exact steps to access the programming mode. Typically, this involves pressing and holding one or two buttons in your car until an indicator light begins to flash differently. You might need to clear existing codes by pressing and holding outer buttons for an extended period, as instructed in your car’s manual.
Programming a Dip Switch Remote to Your Car
Programming a dip switch remote to your car is relatively straightforward:
- Ensure Remote is Working: Verify your dip switch remote is functioning correctly with your gate.
- Position Remote and Car Button: Hold your working gate remote close to the car’s HomeLink or Car2U button you wish to program.
- Press and Hold Both Buttons: Simultaneously press and hold the button on your gate remote and the chosen button in your car until the indicator light in your car changes, indicating successful programming.
- Test: Test the programmed button in your car to operate your gate.
Programming a Rolling Code Remote to Your Car (Two-Step Process)
Programming a rolling code remote to your car involves a two-step process for security reasons:
-
Initial Car Programming:
- Ensure Remote is Working: Confirm your rolling code remote is working with your gate.
- Position Remote and Car Button: Hold your gate remote near the car’s button you want to program.
- Press and Hold Both Buttons: Press and hold both the remote button and the car button until the car’s indicator light changes.
-
Synchronization with Receiver:
- Access Receiver’s Program Button: Go to your gate receiver unit and press the “Program” or “Learn” button (as you would when programming a new remote directly to the gate). Wait for the LED light to illuminate.
- Return to Car and Activate: Immediately return to your car and press and hold the button you just programmed into your car. Hold it until the gate opener responds, indicating synchronization.
- Test: Test the programmed car button to ensure it consistently operates your gate.
Troubleshooting Common Issues
Encountering problems during programming is not uncommon. Here are some troubleshooting tips:
- Remote Not Syncing: Ensure you are following the correct programming steps for your remote type (dip switch or rolling code). Double-check battery levels in your remote.
- LED Light Not Blinking: If the LED light on the receiver or in your car doesn’t blink as expected, re-read the manuals for both your gate opener and car to ensure you’re in the correct programming mode.
- Gate Not Responding: After programming, if the gate doesn’t respond, try repeating the programming steps. Ensure you are within range of the gate when testing.
- Factory Reset: If issues persist, consult your manuals about performing a factory reset on both your gate opener and your car’s HomeLink system, then try programming again.
Always refer to your user manuals for specific troubleshooting advice related to your models.
Maintaining Your Car Programmed Gate Opener
Once successfully programmed, maintaining your car programmed gate opener is simple:
Regular Check-ups for Your Gate Remote
Periodically check your gate remote’s functionality. Ensure the batteries are in good condition and replace them as needed. Clean the remote buttons to prevent sticking.
Dealing with Battery Issues
If you notice your gate opener response becoming sluggish or unreliable, battery replacement is usually the first step. Use the correct type of battery as specified in your remote’s manual and ensure proper installation.
Conclusion
Programming your gate opener to your car is a worthwhile endeavor that significantly enhances convenience and security. By following this comprehensive guide and consulting your specific manuals, you can easily integrate your gate and car for seamless access. Enjoy the simplicity of controlling your gate with the touch of a button from your car!
To explore a wide selection of gate remotes and find compatible options for your system, visit: https://elitegates.net/collections/remote-controls