
Updating the firmware on your RNS 510 navigation system can significantly improve its performance and add new features. This guide provides a step-by-step process for a successful RNS 510 firmware update. We’ll cover everything from determining your current hardware and firmware version to loading the latest maps.
Determining Your RNS 510 Hardware and Firmware Revision
Before starting the Firmware Update Rns 510 process, it’s crucial to know your current system version. There are two primary methods:
-
Physical Inspection: Remove the RNS 510 unit from the dashboard and locate the part number on the device label. This will indicate the hardware revision.
-
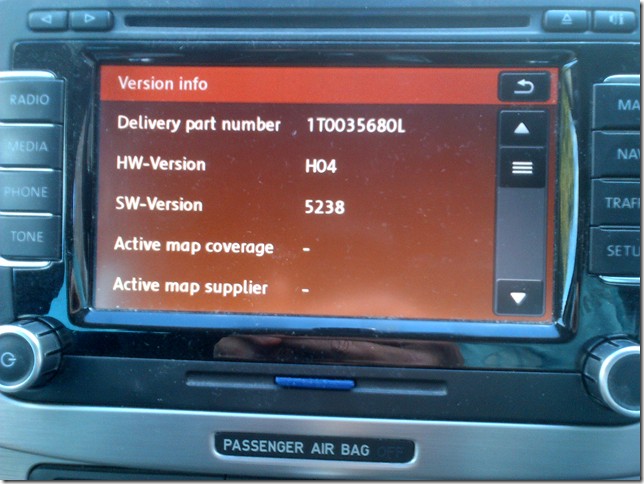
Hidden Menu: Access a hidden menu by pressing the setup button for approximately 10 seconds. If available, a “Version info” option will display the hardware and firmware details. Note: This menu might not be accessible on older firmware versions.
Obtaining the Necessary RNS 510 Firmware
Firmware version 5238 is widely compatible with various RNS 510 hardware revisions (C3-C12). This version often includes a Video-in-Motion (VIM) feature, allowing DVD playback while driving.
You can find RNS510 firmware downloads online through various forums and websites dedicated to car navigation systems. Ensure you download from a reputable source to avoid corrupted files. The downloaded file will likely be a multi-part archive that needs to be extracted and combined into a single ISO image using software like 7-Zip.
This ISO image should then be burned onto a CD-R at the slowest possible speed for optimal compatibility with the RNS 510’s optical drive. A recovery ISO is also recommended in case the firmware update fails.
Performing the RNS 510 Firmware Update
With the firmware CD-R prepared:
- Open the car but do not turn on the ignition.
- Insert the CD-R into the RNS 510. The unit should power on and begin reading the disc. If it doesn’t, press the power button.
- Follow the on-screen prompts. The update process will take approximately one hour and involve several reboots. Do not interrupt the process.
Important Note: This update may erase existing map data and music files on the hard drive. Having a map DVD ready for reinstallation is strongly advised.
Verifying Successful Firmware Update RNS 510
After the reboot, access the hidden menu (press setup for 10 seconds) to confirm the new firmware version. The “Version Info” screen will display the updated software and hardware details.
You may need to reload your map data after the firmware update. This can be done using your original map DVD or by updating to the latest map version.
Updating Maps After Firmware Update RNS 510
Due to the large size of modern map data, using an SD card is a common method for updating maps on the RNS 510. Tools like “maps-tool” can prepare the map data for SD card installation and create a bootable CD to initiate the transfer from the SD card to the RNS 510’s hard drive.
This process generally involves:
- Formatting an SD card (at least 8GB) to FAT32.
- Using “maps-tool” to extract map data from an ISO image and prepare it for SD card transfer.
- Burning a custom loader ISO to a CD-R.
- Inserting the SD card and the loader CD into the RNS 510 and initiating the transfer process via a specific button combination (usually SETUP + EJECT + INFO/MIC).
The map transfer will take approximately 30 minutes. Upon completion, the unit will reboot, and the new maps will be available. Verify the successful map update by checking the map version in the hidden menu.
Conclusion
Updating the firmware and maps on your RNS 510 can seem daunting, but by following these steps carefully, you can achieve a successful upgrade and enjoy the latest features and improved performance. Remember to always back up your data and use reputable sources for your downloads.