
Understanding and managing exhaust back pressure is crucial for optimizing your vehicle’s performance. An Exhaust Pressure Tester allows you to pinpoint restrictions in your exhaust system, enabling informed decisions about modifications and upgrades. This guide provides a step-by-step approach to building your own exhaust pressure tester and using it effectively.
Building Your Own Exhaust Pressure Tester
Creating a functional exhaust pressure tester doesn’t require expensive equipment. With readily available parts and a little ingenuity, you can assemble one yourself. Here’s what you’ll need:
- Pressure Gauge: A mechanical pressure gauge capable of reading up to 20 psi. These are commonly available at auto parts stores. Mechanical gauges are often preferred for this application due to their durability and affordability.
- Spark Plug Defouler: This threaded adapter, designed for spark plugs, conveniently shares the same threading as an oxygen (O2) sensor, providing a readily available point of access to your exhaust system.
- Fitting and Hose: Source a fitting from a hardware store that screws securely into the spark plug defouler. JB Weld can be used to ensure a tight and leak-free seal. High-temperature transmission fluid hose is recommended to connect the fitting to the pressure gauge as it can withstand the heat generated by the exhaust system. Secure the hose with sturdy hose clamps.
- Hose Clamps: Use high-quality hose clamps to ensure a secure connection between the hose and fittings, preventing leaks and ensuring accurate readings. Exhaust back pressure can easily dislodge poorly secured hoses.
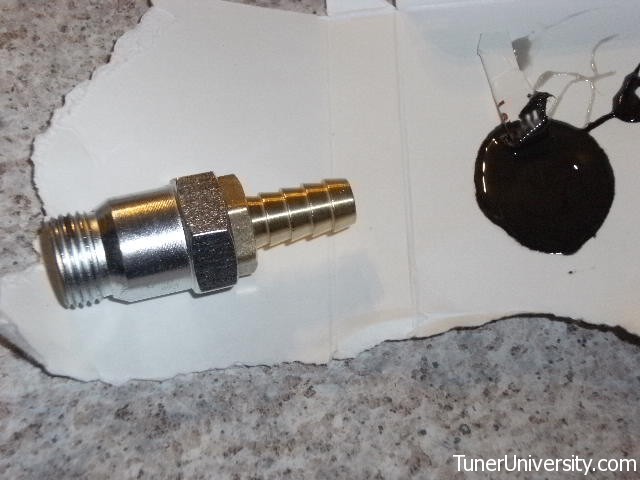 alt
alt
Using the Exhaust Pressure Tester
Once assembled, using your exhaust pressure tester is straightforward:
- Locate an O2 Sensor: Identify a secondary O2 sensor in your exhaust system. Unscrew the sensor and temporarily install your custom fitting in its place. Secure the disconnected O2 sensor with a zip tie to prevent it from dangling.
- Connect the Hose: Run the high-temperature hose from the fitting to your pressure gauge. Ensure the hose is free of kinks and the connections are airtight. Adapters may be needed to ensure compatibility between the hose and gauge.
- Take Measurements: With the engine running, perform a wide-open throttle (WOT) test and observe the peak pressure reading on the gauge. This reading represents the back pressure from the chosen measurement point to the exhaust outlet.
To pinpoint restrictions, take measurements at different points along the exhaust system. For example, to assess the impact of the catalytic converter, measure pressure before and after the component. The difference between the readings will indicate the pressure drop across the converter, revealing its contribution to overall back pressure.
Interpreting the Results
Most stock exhaust systems exhibit peak pressures in the 8-10 psi range under full load. A well-designed aftermarket exhaust system typically reduces this to 4-5 psi, with some high-performance systems achieving even lower readings. However, keep in mind that excessively low back pressure can sometimes negatively impact low-end torque.
The primary value of these measurements lies in comparison. Track changes in pressure after modifications to gauge their effectiveness. Compare readings before and after installing a new muffler, catalytic converter, or other exhaust components to assess their impact on performance.
Advanced Exhaust Pressure Testing: Differential Pressure Gauges
For more precise measurements and easier solo testing, consider using a differential pressure gauge or a digital manometer with data logging capabilities. These tools allow for direct comparison of pressures at two different points in the exhaust system simultaneously. Ensure the chosen gauge can handle pressure spikes of up to 20 psi without damage. A digital gauge with data logging allows for more in-depth analysis and eliminates the need for a second person to assist with readings.
Conclusion
An exhaust pressure tester is a valuable tool for diagnosing and improving your vehicle’s exhaust system. By building your own tester and following the steps outlined in this guide, you can gain valuable insights into your exhaust system’s performance and make informed decisions about modifications. This DIY approach provides a cost-effective method for identifying restrictions and optimizing your vehicle for maximum performance.