
A Compression Test Engine is a fundamental diagnostic procedure used to assess the health of an engine. This test measures the pressure inside each cylinder during the compression stroke, providing valuable insights into the engine’s internal condition. Low compression in one or more cylinders can lead to various problems, ranging from misfires to significant power loss. Understanding how to perform and interpret a compression test is crucial for any DIY mechanic or car enthusiast.
Why Perform a Compression Test Engine?
A compression test engine helps pinpoint the source of various engine performance issues. Inconsistency in pressure readings across cylinders often indicates underlying problems that require attention. Just like checking tire pressure, consistent readings signify a healthy system, while a significant deviation indicates a problem area. This test can reveal issues such as:
- Worn Piston Rings: Worn rings allow combustion gases to leak past the piston, resulting in low compression.
- Damaged Valves: Damaged or burnt valves can prevent the cylinder from sealing properly, leading to low compression.
- Blown Head Gasket: A blown head gasket can cause coolant to leak into the cylinders or combustion gases to escape, affecting compression.
- Incorrect Valve Timing: Improper valve timing can disrupt the engine’s compression cycle, leading to low readings.
How to Perform a Compression Test Engine
Performing a compression test engine is relatively straightforward, requiring a few basic tools and some knowledge about your engine.
1. Gather Your Tools and Prepare the Vehicle:
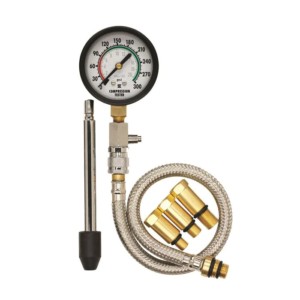
You will need a compression tester, a ratchet, spark plug socket, extensions, safety glasses, and gloves. Disconnect the ignition system by removing the fuel pump fuse or relay and disconnecting the coil wire or sensor connector. For carbureted engines, disabling the fuel supply is often unnecessary.
2. Remove the Spark Plugs:
Carefully remove all spark plugs using the appropriate tools. This ensures accurate readings and prevents damage to the plugs.
3. Connect the Compression Tester:
Select the correct adapter for your engine and thread it into the spark plug hole of the first cylinder.
4. Crank the Engine:
Have an assistant crank the engine for several revolutions until the gauge needle stabilizes. Record the reading. Release the pressure from the tester.
5. Repeat for Each Cylinder:
Repeat steps 3 and 4 for each cylinder, recording the readings in order. Note any significant deviations.
Interpreting Compression Test Engine Results
Analyzing the compression test engine results involves comparing the readings across all cylinders. Readings should ideally be within 10% of each other. Consistent readings within the manufacturer’s specified range indicate a healthy engine. Here’s a closer look at interpreting the results:
- Consistent Low Compression in All Cylinders: This can indicate worn piston rings or cylinder wear.
- Low Compression in One Cylinder: This often points to a problem specific to that cylinder, such as a burnt valve or a damaged piston.
- Two Adjacent Cylinders with Low Compression: This can suggest a blown head gasket between those cylinders.
Diagnosing and Addressing Low Compression
Low compression readings require further investigation to determine the root cause. A leak-down test can help pinpoint the source of the leak, whether it’s through the rings, valves, or head gasket. Once the cause is identified, appropriate repairs can be undertaken.
Conclusion
A compression test engine is a valuable tool for diagnosing engine problems. By understanding how to perform this test and interpret the results, you can gain valuable insights into the health of your engine. While this guide provides a general overview, always consult your vehicle’s repair manual for specific instructions and specifications. Consistent monitoring and timely maintenance are essential for optimal engine performance and longevity. If you are unsure about performing this test yourself, consult a qualified mechanic.