
Is your car’s air conditioning not blowing as cold as it used to? Especially in older vehicles, a common culprit for diminished AC performance is low refrigerant. Over time, even in sealed systems, refrigerant can slowly leak out, reducing the system’s cooling efficiency. If you’ve noticed your car’s AC struggling to keep you cool, or if you hear a hissing sound from the vents, a Car Ac Recharge might be the solution. This guide will walk you through the process of safely and effectively recharging your car’s AC system, helping you restore that refreshing cool air and comfortable driving experience.
Understanding When Your Car AC Needs a Recharge
Before diving into the DIY process, it’s crucial to understand why your car’s AC might need a recharge and rule out other potential issues. While AC systems are designed to be sealed, refrigerant loss is a natural occurrence, particularly in vehicles older than 6-8 years. Rubber seals and o-rings can degrade over time, leading to gradual leaks.
Common symptoms of low refrigerant include:
- Weak or warm airflow: The most obvious sign is a noticeable decrease in cooling power. The air from your vents may not be as cold as it used to be, or it might even feel warm.
- Hissing noises from vents: A low refrigerant level can sometimes cause a hissing sound from your car’s vents, indicating air or low refrigerant pressure within the system.
- AC compressor cycling on and off frequently: The compressor might cycle on and off more often than usual as it struggles to maintain cooling with insufficient refrigerant.
- Reduced overall AC performance: It takes longer for your car to cool down, especially in hot weather.
However, it’s important to differentiate refrigerant loss from other AC system problems. Issues with the compressor, condenser, evaporator, expansion valve, or blower motor can also cause poor cooling. Before attempting a car AC recharge, consider these checks, as outlined in the original article:
- Compressor Function: Ensure the compressor engages when you turn on the AC. You should hear a click and observe the compressor belt running smoothly.
- Evaporator Drain: Check for proper drainage from the evaporator. Clogged drains can lead to water accumulation inside the car, but this isn’t directly related to refrigerant levels.
- Condenser Condition: Inspect the condenser (usually located in front of the radiator) for debris or damage that might restrict airflow.
- Blower Motor Operation: Confirm the blower motor is working at different speeds.
- Cabin Air Filter: A clogged cabin air filter can reduce airflow and cooling efficiency, although it’s not related to refrigerant.
If these components seem to be functioning correctly and your car is experiencing the symptoms of low refrigerant, then a car AC recharge is likely the next step.
Tools and Materials for Car AC Recharge
To perform a DIY car AC recharge, you’ll need specific tools and materials. Gathering everything beforehand will make the process smoother and safer.
Essential Tools:
- AC Manifold Gauge Set: This is the core tool for AC work. It consists of two gauges (high and low pressure), color-coded hoses (blue for low pressure, red for high pressure, yellow for refrigerant), and quick couplers to connect to your car’s AC system.
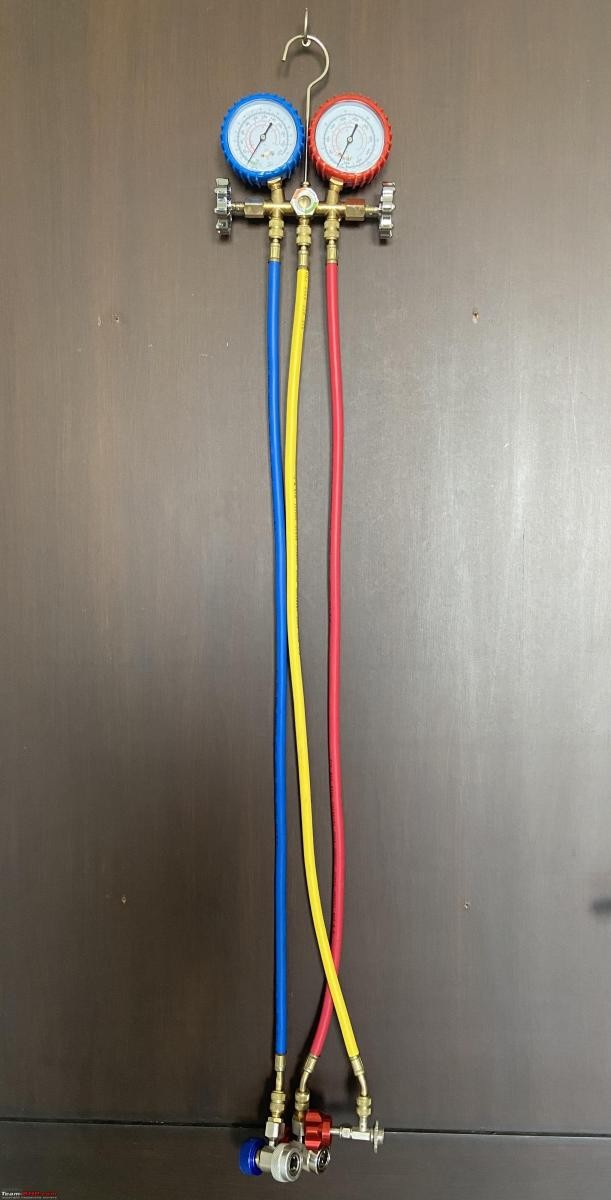 AC Manifold Gauge Set
-
Refrigerant Can Tap Valve: This valve screws onto the refrigerant can and allows you to safely tap and control the flow of refrigerant into the system.
-
Probe Thermometer (or Digital Multimeter with Thermocouple): Used to measure the vent temperature and verify the effectiveness of the recharge.
Consumables:
- R-134a Refrigerant Can(s): R-134a is the standard refrigerant for most cars manufactured before 2021. Check your car’s AC system sticker (usually under the hood) to confirm the correct refrigerant type and capacity. A typical passenger car may require one or two 12-ounce cans.
Personal Protective Equipment (PPE):
- Safety Goggles: Refrigerant can cause serious eye injury upon contact. Always wear safety goggles.
- Nitrile Gloves: Refrigerant can cause frostbite on skin contact. Wear nitrile gloves to protect your hands.
Step-by-Step Car AC Recharge Procedure
Safety First: Work in a well-ventilated area. Refrigerant is heavier than air and can displace oxygen in enclosed spaces. Never smoke or work near open flames while handling refrigerant.
-
Prepare the Vehicle and Equipment:
-
Start your car’s engine and turn the AC to maximum cooling (lowest temperature, highest fan speed).
-
Locate the low-pressure (LP) and high-pressure (HP) service ports in your engine bay. The LP port is usually on a larger diameter pipe and has a smaller diameter fitting. The HP port is on a smaller diameter pipe with a larger diameter fitting. Refer to your vehicle’s service manual if you are unsure of their location.
-
Attach the AC manifold gauge set by hanging it under the hood. Ensure both manifold valves are closed (clockwise).
-
Attach the refrigerant can tap valve to the R-134a refrigerant can, ensuring the valve is open (counter-clockwise) before piercing the can to prevent accidental refrigerant release.
-
-
Connect the Manifold Gauges to Service Ports:
-
Remove the dust caps from the LP and HP service ports. Keep them in a safe place.
-
Connect the blue hose quick coupler (LP) to the LP service port and the red hose quick coupler (HP) to the HP service port. They should snap into place.
-
Open the valves on the quick couplers gently. This allows pressure readings to register on the gauges.
-
-
Take Initial Pressure Readings:
- Observe the pressure readings on both the low-pressure (blue) and high-pressure (red) gauges with the AC running. Note these readings for reference.
- Have an assistant rev the engine to around 1500 RPM and note the pressure readings again. This simulates driving conditions and provides more accurate readings.
- Compare your readings to a pressure-temperature chart for R-134a refrigerant, considering the ambient temperature. This chart (readily available online) will give you an idea of whether your system is low on refrigerant. Ideal low-side pressure at ~80°F (27°C) ambient temperature is typically in the 35-45 PSI range.
-
Purge Air from the Yellow Charging Hose:
- Connect the yellow hose to the refrigerant can tap valve.
- Loosen the yellow hose connection at the manifold slightly to purge any air from the hose. Allow a small amount of refrigerant to escape, then tighten the connection. This ensures only refrigerant enters the system, not air or moisture.
-
Begin Charging the AC System:
-
Slowly and gradually open the low-pressure (blue) side manifold valve (counter-clockwise) to allow refrigerant to flow into the system. Observe the refrigerant flow through the sight glass on the manifold (if equipped).
-
Monitor both the low-pressure and high-pressure gauges as you add refrigerant. The high-side pressure should start to rise.
-
Charge in short bursts, checking the pressure readings and vent temperature frequently. Avoid overcharging, as this can damage the system and reduce cooling efficiency.
-
-
Monitor Pressure and Vent Temperature:
- Refer to the R-134a pressure-temperature chart and your vehicle’s specifications for target pressure ranges at your ambient temperature.
- Aim for the recommended pressure range on the low-pressure side. The high-pressure side will also rise, but the low-pressure reading is more critical for charging.
- Use your probe thermometer to measure the air temperature at the vents. You should notice a decrease in temperature as you add refrigerant. Aim for vent temperatures in the 40-50°F (4-10°C) range, depending on ambient temperature and humidity.
-
Stop Charging and Observe:
- Once the pressures are within the recommended range and the vent temperature is significantly cooler, close the low-pressure manifold valve (clockwise).
- Disconnect the refrigerant can and close the tap valve.
- Continue to monitor the vent temperature for a few minutes to ensure cooling performance has improved.
-
Disconnect Gauges and Replace Dust Caps:
- Close the quick coupler valves.
- Carefully disconnect the quick couplers from the service ports. Some refrigerant might escape – this is normal, but minimize release.
- Replace the dust caps on the service ports to protect them from dirt and debris.
-
Final Vent Temperature Check:
- Perform a final check of the vent temperature to confirm the AC recharge was successful in restoring cooling performance.
Important Considerations and Safety Precautions
- Never Overcharge: Overcharging the AC system is a common mistake and can lead to compressor damage and reduced cooling. Charge slowly and monitor pressures carefully. Less is often more when it comes to refrigerant.
- Leak Detection: If your AC system loses refrigerant quickly after a recharge, it indicates a leak. Consider using a leak detector or adding UV dye (by a professional) to pinpoint the leak source before repeated recharging.
- System Vacuuming: For optimal AC performance and longevity, especially if the system was significantly depleted or opened for component replacement, it’s best to have the system professionally evacuated (vacuumed) before recharging. This removes air and moisture, which are detrimental to AC system health.
- Refrigerant Type: Always use the correct refrigerant type specified for your vehicle (usually R-134a for older cars, R-1234yf for newer cars). Mixing refrigerants can damage the system.
- Professional Help: If you are uncomfortable performing this DIY car AC recharge, or if you suspect a more serious AC system problem beyond low refrigerant, consult a qualified automotive AC technician. They have specialized equipment and expertise to diagnose and repair complex AC issues.
Conclusion
Recharging your car’s AC system can be a straightforward DIY task that restores cooling performance and comfort, especially in older vehicles experiencing gradual refrigerant loss. By following these steps carefully, using the right tools, and prioritizing safety, you can effectively perform a car AC recharge and enjoy cool driving again. However, remember that this guide is for basic refrigerant top-ups. For complex AC issues or suspected leaks, seeking professional service is always recommended to ensure proper diagnosis and repair of your car’s air conditioning system.